Switching from an IMAP account to POP3 account will mitigate the server from administering the emails of user. Reason being with POP3 account, mails gets saved on the user’s system locally. The conversion of IMAP account to POP3 accounts is mentioned clearly in the following steps.
In Outlook 2010 and Outlook 2013, the Auto Account setup feature will make an attempt to configure the web based e- mail account as an IMAP account. However, the situation is different in Outlook 2007, it seeks to configure as a POP3 account.
There is no direct process to convert from IMAP account to POP3 but users can try out a comparatively easy process which consists of the following steps:
- Simply add POP3 account
- Move the mail folders
- Delete current IMAP account
Step 1: Add POP3 Account
To add the POP3 account, move to Account settings option:
In case of Outlook 2003
Select Tools >> E-mail Account >> Options >> Select: Add an E-mail account
In case of Outlook 2007
Select Tools >> Account Settings >> Click on the new tab >> Add a New Email account
In case of Outlook 2010 and Outlook 2013, the configurations are little different:
Select File >> Section Info >> Account Settings >> Account Settings >> Add email account
In case of Outlook 2007, 2010 and 2013, the Auto Account Setup feature is there to fill the details like user’s name, email address and password details. Outlook will make an attempt to search the email server settings. When it is completed, a confirmation message on screen will be displayed. If for some reason, the auto-configuration does not complete successfully or in case if it detects IMAP settings, users can opt for the manual configuration by selecting the option “Manually Configure Server Settings or additional Server types.”
It must be noted that while configuring the POP3 settings manually on Outlook 2007, 2010, and 2013 or in case of Outlook 2003, the user should make sure to have all the details of server configuration ready. However, if the user doesn’t have the settings, then they can check with their respective email provider to verify that the POP3 settings are correct or not.
The server settings for all major free email providers like Hotmail, Gmail, Yahoo, and Outlook.com can be obtained online from their respective sites
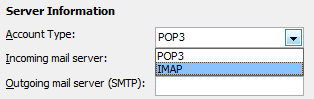
The above figure shows that when a user configures the account manually, it prompts to configure it as a POP3 account in place of an IMAP account.
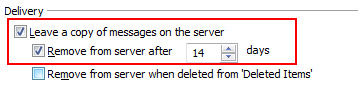
Note: While configuring POP3 account, users can set it in such a way so as to leave a copy of messages on the server for a couple of days
Step 2: Move the Mail Folders
Once the user’s account has been added as a POP3 account, all the emails which are present in the Inbox folder of the IMAP account will start downloading. However, the contents from sent items and additional sub-folders created by users won’t get downloaded. It is because POP3 protocol provides for downloading the messages from the inbox folder only.
For moving messages, users can simply follow the regular method (by using Ctrl +A) of selecting the emails or folders that they want to transfer into POP3 settings account and then make a copy of it. Users can also easily drag and drop to move the messages. While using the drag & drop feature through right mouse click, users will get an option either to copy or move the messages selected.
Note: One cannot just copy the entire folder of inbox to move it to POP3 settings account. Select the messages in the inbox that are required to be transferred and then initiate with copy.
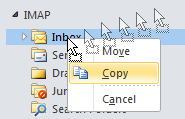
The figure shows the method of Right-click Drag and drop.
To keep the original structure of messages intact, users can first clear out the contents of POP3 account. The status of all the messages like read or unread will remain unchanged even after transferring the contents to the new account. This act is done to avoid any duplicate messages in the inbox.
The smoothest way to move the Calendar items at once is by placing Calendar folder in a list view. For example- All Appointments list view or category view. Then move the items by selecting them (via CRTL+A) and then apply drag & drop option.
In order to change the Calendar view to a list view, follow the steps below:
In case of Outlook 2003
Select View >> Arrange By >> Current View >> By Category
In Outlook 2007
View >> Current View >> All Appointments
In Outlook 2010 and Outlook 2013
Select tab View >> Change View >> List
Step 3: Delete Current IMAP Account
After all the messages are copied to POP3 account mailbox, the IMAP account can be removed by accessing the Account Settings option.
For Outlook 2003, make it clear to select the option “View or change existing email accounts” in order to proceed to the account details.
In case of Outlook 2013, proper steps should be taken to ensure that the PST file of the POP3 account is placed as default store before aiming to remove the IMAP account. This can be done by selecting “Data” option, then choose POP3 mailbox store that contains the PST file and finally click on the option “Set as Default.”
It should be noted that it is mandatory to restart the system in case of Outlook 2013 while switching the default mailbox store from IMAP to POP3 account. After the system restarts, users can move to the Account Settings option again and remove the IMAP account successfully.
Bottom Line: Besides Outlook, many other email clients are there which support both IMAP and POP3 accounts for downloading of emails. One of the main advantages of moving over to POP3 account from IMAP is that presently more POP3 compatible software is available in the market.