Creating a website is just the start of the journey. Once you’ve built your website, you’ll need to keep it up-to-date, back up your data, and keep it safe by preventing unauthorized access.
A regular backup is the best option for website restoration if any issues occur. You can simply roll back to the last working version. You should also have a current backup before making major changes to your site, such as updating software, installing plugins, or other maintenance.
For the owners of VPS/Dedicated Servers with the Complete management, we create full server backups for you. Feel free to read more about the server management types for VPS and Dedicated Servers.
When backing up your site, you will need to consider where to save the website data. Your first option is to store your archived content on a home PC or external storage device such as an external hard drive or thumb drive. There are also cloud-based backup services that can safely encrypt and store your files.
WHM offers a storage monitoring tool in the backup menu. We will explain how this works further on in this guide.
- Global Settings
- Scheduling and Retention
- Files
- Databases
- Configure the Backup Directory
- Additional Destinations
The simplest way to perform a manual backup is just to download a compressed set of files representing your theme and design files as well as your content database. To do this, you can use the Compress function in the cPanel File Manager:

The phpMyAdmin option allows you to download your databases as a .sql file (read more about phpMyAdmin here). We recommend that you perform backups of the website’s database regularly, as all of your site’s posts and pages are stored there. This database is essential in the website restoration process.

If you are hosting cPanel accounts as a reseller, you may offer your clients the option to create their own backups using the in-built cPanel menus Backup and Backup Wizard:

The instructions on how to use these options can be found here. The functionality of the menus is very similar, and both allow full and partial backups creation and restoration. These menus do not automate the process, but, they do offer a number of options for the manual backups.
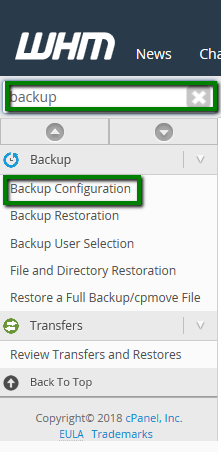
The Backup Configuration WHM menu allows you to set up automated backups. It can be found in the Backup section on the left-side WHM menu.
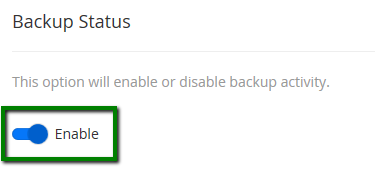
The Backup Status has to be set to Enabled in order to activate automated backups:
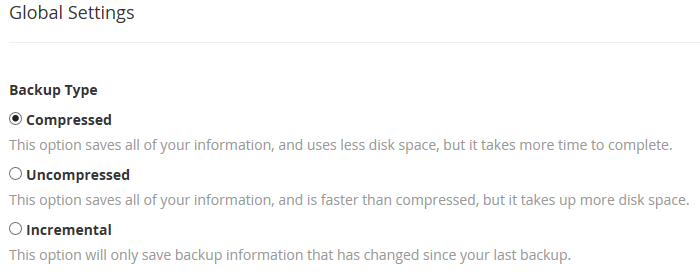
If you choose to store the backup on the same server, pay attention to the Backup Type in Global Settings. It offers three different options:
- Compressed – Ideal for saving space, but the backup process will be slower.
- Uncompressed – A quicker backup, but one that uses more disk space.
- Incremental – Only saves the files and the configuration that have changed since the last backup.
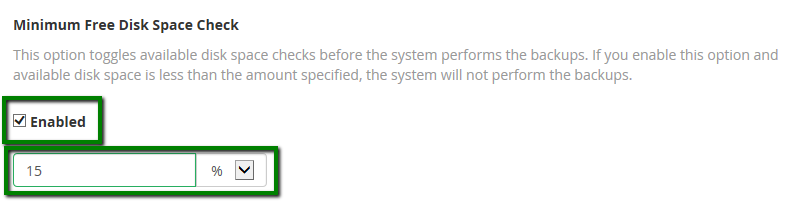
The Minimum Free Disk Space Check is necessary if you want to control storage usage on the server. If this setting is not modified, the backup will be created regardless of how much free space is available, and you might run out of space on the server.
You can choose between megabytes (actual space allocated for the backups) and percentage (limits backup storage allocation to a proportionate amount of server space). Choosing a percentage ensures other services on the server have enough space to run safely.
For example, MySQL needs at least 5% disk space free in order to run. Other modules and services will also need free disk space. Thus, we recommend you leave at least 10-15% of a disk space secured.
Maximum Destination Timeout should be used to specify the time in which you expect the backup to be generated. It should allow enough time to handle the largest file, otherwise, the process will be aborted. The maximum value is 50000 seconds here.

The same goes for the Maximum Restore Timeout which is used for the backup restoration purposes.
The top value is 86400.

Create your backup schedule using the Scheduling and Retention menu.
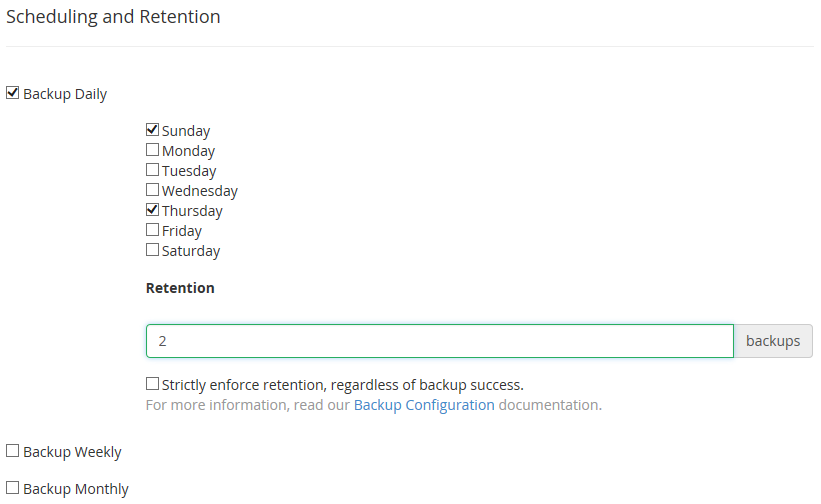
There are three scheduling options to choose from:
- Daily backups that allow you to specify which day of the week backups should be made.
- Weekly backups are performed every 7 days starting with the day the backup creation was enabled.
- Monthly allow you to create backups once a month.
We recommend trying daily or weekly backups with a moderate retention of 1-2 copies. Retention refers to how many previous backups will be kept before the oldest backup gets overwritten by a newly-created one.
PLEASE NOTE: These backups consume disk space when saved on the server, so it is important to save only as many copies as you think you will need.
The Strictly enforce retention, regardless of backup success checkbox means that the old backup will be deleted and replaced with the latest one. Even if the new backup is incomplete, corrupted or empty (due to being impossible to generate, not having enough time or space, etc.) it will still replace the old one. We recommend disabling this option to make sure that working older backups are not overwritten with a newer invalid one.
In the Files section, you can choose what content you wish to save.
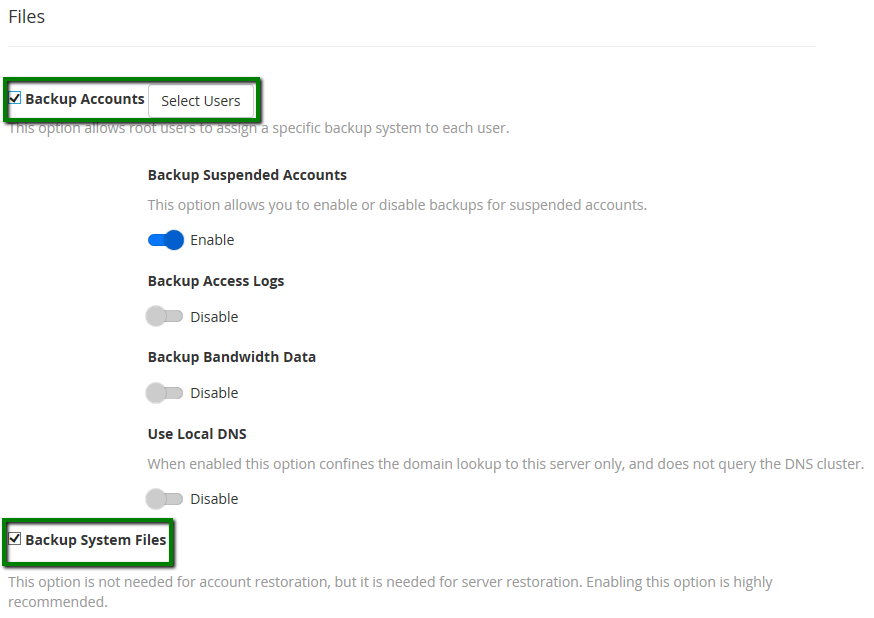
We recommend always having these two checkboxes selected at all times:
- Backup Accounts (This is needed for cPanel restoration purposes.)
- Backup System Files (This option offers a possibility to restore the whole server.)
As for other features under Backup Accounts, it is up to the server owner to decide if these are needed or not.
Clicking on the Select Users button near the Backup Accounts, will open a second tab labelled Backup User Selection. It is possible to check accounts that are currently added to the server backup and add or remove any of them.

In the Databases section, it is possible to create a backup of separate .sql files or the whole MySQL server directory.
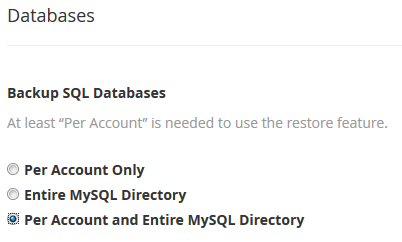
Backing up the MySQL databases per account will allow you to restore individual cPanel accounts.
The entire MySQL directory contains the whole MySQL service of the server and all the related settings.
It is ideal to select both options, because it will protect your server and websites if the MySQL service itself goes down as well as if an individual website experiences issues.
Configure the Backup Directory
The Configure the Backup Directory section allows you to specify the path on the server where the backups will be saved. This is also where you can establish an external location for the backups.
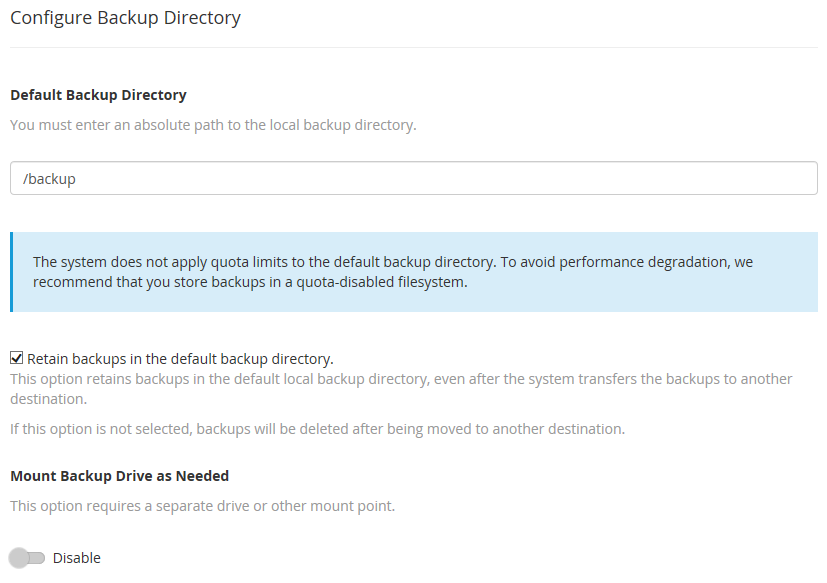
It is possible to save automated full backups to an external storage device. This might be another server purchased for this purpose specifically or another cloud service. It is important to remember that on the third-party storage you need to manually remove outdated backup archives. If there is no space at that location, the WHM/cPanel will not be able to save a new copy there.
All this can be configured in the Additional Destinations section. You can set up certain popular storage options with the help of the drop-down menu and the Create New Destination button:
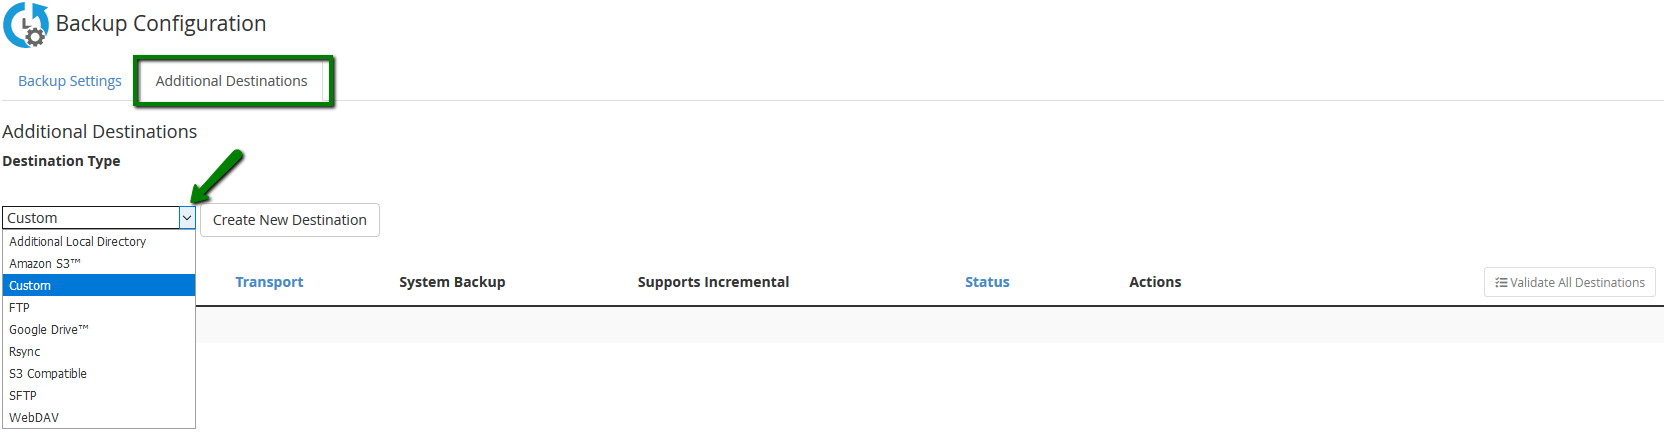
The section supports setting up a custom external storage. We recommend that this setup be performed by a professional developer or a network admin. Sensitive settings and security permissions need to be carefully checked, and misconfiguration may result in failed backups.
In our example, we use the Google Drive option. Choosing a preset configuration option like Google Drive requires knowing the details for that storage (in this case, the Google API and the account credentials):
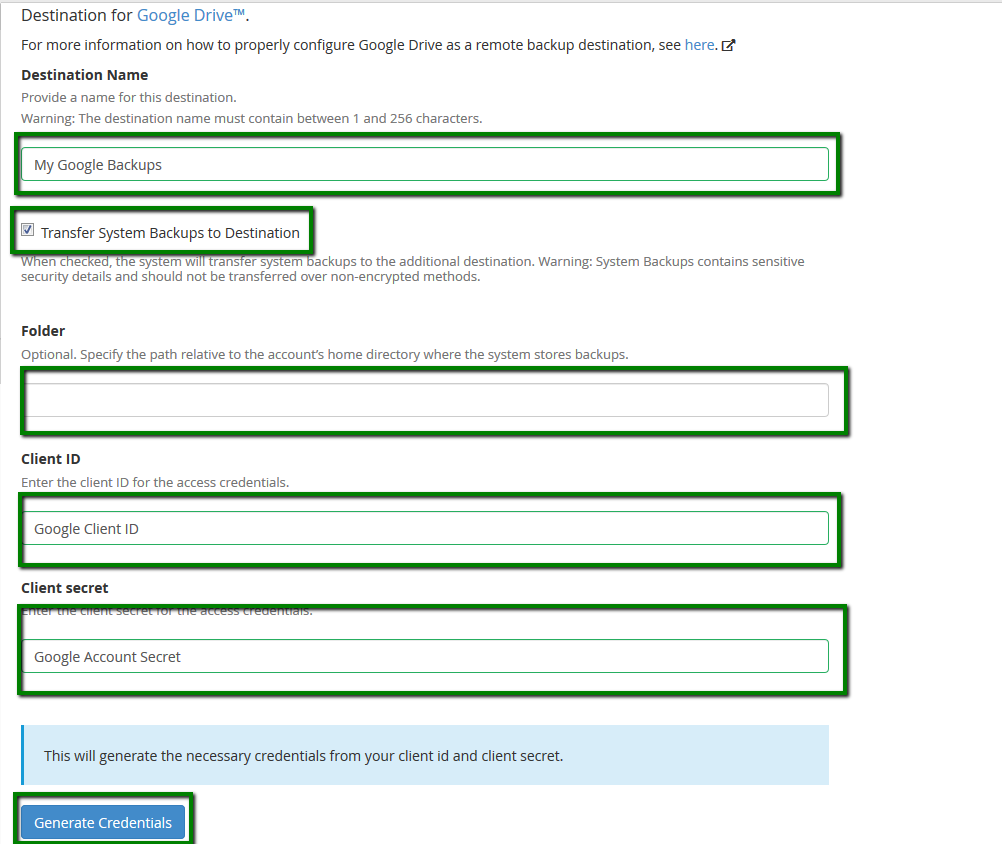
The following fields should be filled in:
- Destination Name – a name to identify this backup rule on your server
- Transfer System Backups to Destination – check this option if you prefer that backups are removed from the server and only saved to Google Drive
- Folder – an optional setting to specify the folder to which the backups are saved. If left blank, the system will use the home directory
- Client ID – the ID of your Google Account
- Client Secret – a Google Client secret that is generated in the Google account
For a better understanding of the Google Drive setup, we advise getting acquainted with the Google API as it is required for the full use of Google Drive and using the client ID and secret.
The configured destination must be validated to ensure the successful access. Make sure to do so and save all the changes:
