Cloud Server Security Tips
1. Changing SSH Default Port
2. Protecting from Brute Force Attacks
3. Disable Password-based Authentication
4. Protecting from DDoS Attacks
5. Regular Backup
6. Regular Update
7. Don’t leave opened ports
1. Changing SSH Default Port
By default, SSH daemon listen on port number 22. This means if anyone finds your IP can attempt to connect to your server.
They may not be able to get into the server if you have secured with a complex password. However, they can launch brute force attacks to disturb the server operation.
The best thing is to change the SSH port to something else so even though if someone knows the IP, they can’t attempt to connect using default SSH port.
Changing SSH port in Ubuntu/CentOS is very easy.
- Login to your VM with the root privilege
- Take a backup of sshd_config (/etc/ssh/sshd_config)
- Open the file using VI editor
vi /etc/ssh/sshd_config
Look for line which has Port 22 (usually at the beginning of the file)
# What ports, IPs and protocols we listen for
Port 22
- Change 22 to some other number (ensure to remember as you will need that to connect). Let’s say 5000
Port 5000
- Save the file and restart the SSH daemon
service sshd restart
Now, you or anyone won’t be able to connect to your server using SSH default port. Instead, you can use the new port to connect.
If using SSH client or Terminal on MAC then you can use -p to define the custom port.
ssh -p 5000 [email protected]
Easy, isn’t it?
2. Protecting from Brute Force Attacks
One of the common mechanism used by a hacker to take control your online business is by initiating brute force attacks against the server and web platform like WordPress, Joomla, etc.
This can be dangerous if not taken seriously. There is two popular program you can use to protect Linux from brute force.
SSH Guard
SSHGuard monitors the running services from the system log files and blocks repeated bad login attempts.
Initially, it was meant for SSH login protection, but now it supports many others.
- Pure FTP, PRO FTP, VS FTP, FreeBSD FTP
- Exim
- Sendmail
- Dovecot
- Cucipop
- UWimap
You can get SSHGuard installed with the following commands.
Ubuntu:
apt-get install SSHGuard
CentOS:
wget ftp://ftp.pbone.net/mirror/ftp5.gwdg.de/pub/opensuse/repositories/home:/hornos:/centos/CentOS_CentOS-6/x86_64/sshguard-1.5-7.1.x86_64.rpm
rpm -ivh sshguard-1.5-7.1.x86_64.rpm
Fail2Ban
Fail2Ban is another popular program to protect SSH. Fail2Ban automatically update the iptables rule if failed login attempt reaches the defined threshold.
To install Fail2Ban in Ubuntu:
apt-get install fail2ban
and to install in CentOS:
yum install epel-release
yum install fail2ban
SSH Guard and Fail2Ban should be sufficient to protect SSH login. However, if you need to explore more then, you may refer the following.
- CSF (ConfigServer Security & Firewall)
- DenyHosts
3. Disable Password-based Authentication
If you log in to your server from one or two computers, then you can use SSH key-based authentication.
However, if you have multiple users and often log in from multiple public computers the, it might be troublesome to exchange key every time.
So based on the situation, if you opt to disable password-based authentication, you can do it as following.
Note: this assumes you have already setup SSH key exchange.
- Modify
/etc/ssh/sshd_configusing vi editor - Add the following line or uncomment it if exist
PasswordAuthentication no
- Reload the SSH Daemon
4. Protecting from DDoS Attacks
DDoS (Distributed Denial of Service) can happen at any layer, and this is the last thing you want as a business owner.
Finding the origin IP is possible, and as a best practice, you shouldn’t be exposing your server IP to the public Internet. There are multiple ways to hide the “Origin IP” to prevent the DDoS on your cloud/VPS server.
Use a load balancer (LB) – implement an Internet-facing load balancer, so server IP is not exposed to the Internet. There are many load balancers you can choose from – Google Cloud LB, AWS ELB, Linode Nodebalancer, DO LB, etc.
Use a CDN (Content Delivery Network) – CDN is one of the great ways to improve the website performance and security.
When you implement CDN, you configure DNS A record with the anycast IP address provided by CDN provider. By doing this, you are advertising CDN provider IP for your domain and origin is not exposed.
There is many CDN provider to accelerate the website performance, DDoS protection, WAF & many other features.
Cloud Flare
MaxCDN
Incapsula
SUCURI
KeyCDN
So pick the CDN provider who provider performance & security both.
Tweak the Kernel settings & iptables – you can leverage iptables to block suspicious requests, non-SYN, bogus TCP flag, private subnet and more.
Along with iptables, you may also configure the kernel settings. Javapipe has explained it well with the instructions so that I won’t duplicate it here.
Use a firewall – If you afford a hardware-based firewall then excellent otherwise you may want to use a software-based firewall that leverage iptables to protect the incoming network connection to the VM.
There are many, but one of the most popular one is UFW (Uncomplicated Firewall) for Ubuntu and FirewallD for CentOS.
5. Regular Backup
Backup is your friend! When nothing works then the backup will rescue you.
Things can go wrong, but what if you don’t have the necessary backup to restore? Most of the cloud or VPS providers offer backup at a little extra charge and one should always consider.
Check with your VPS provider how to enable backup service. I know Linode and DO charge 20% of droplet pricing for the backup.
If you are on Google Compute Engine or AWS, then schedule a daily snapshot.
Having backup will quickly allow you to restore the entire VM, so you are back in business. Or with the help of a snapshot, you can clone the VM.
6. Regular Update
Keeping your VM OS up-to-date is one of the essential tasks to ensure your server is not exposed to any latest security vulnerabilities.
In Ubuntu, you can use apt-get update to ensure the latest packages are installed.
In CentOS, you can use yum update
7. Don’t leave opened ports
In other word, allow the needed ports only.
Keeping unwanted opened ports like an inviting attacker to take advantage. If you are just hosting your website on your VM then most likely you need either port 80 (HTTP) or 443 (HTTPS).
If you are on AWS, then you can create the security group to allow only the required ports and associate with the VM.
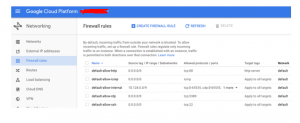
If you are on Google Cloud, then allow the necessary ports using “firewall rules.”
And if you are using VPS then apply basic iptables ruleset as explained in Linode guide.
The above should help you in hardening and secure your server for better protection from online threats.
Alternatively, if you are not ready to manage your VM, then you may prefer Cloudways who manage multiple cloud platform.
And if you are specifically looking for premium WordPress hosting then WP Engine.