How to Back Up Your Website Using Plesk
See How to Determine Which Version of Plesk Control Panel is Installed on a Server to know which set of directions to follow.Back Up a Site in Plesk 12.X and 12.5
- Log in to the Control Panel.
- From the Domainstab, click the domain. (If the correct domain isn’t listed, choose it’s subscription from the drop down menu in the upper right.)
- Select the Websites & Domains tab.
- Select the Backup Manager in the right hand menu.
- Select Back Up.
- Server Repository will be selected by default unless you have set up a FTP repository.
- In Plesk 12, under the Backup Settings section select the radio button labeled Domain configuration and content. Leave the drop box the way it is.
In Plesk 12.5 under Backup Content->Type, select Full or Incrememental as needed. An incremental backup will only backup those files which have changed since the last backup. For this reason we recommend Full backups. - DO NOT select the Suspend domain until backup task is completed. Should the backup fail, your domain would remain suspended and inaccessible to your website viewers.
- Once the backup is completed you can download it from the main backup screen by clicking on the Green Circle/Arrow icon on the right side of the backup listing.

Back Up a Site in Plesk 11.X
- Log in to the Control Panel.
- From the Domainstab, click the domain. (If the correct domain isn’t listed, choose it’s subscription from the drop down menu in the upper right.)
- Select the Websites & Domains tab.
- Select the Backup Manager.
- Select Back Up.
- Select Server Repository.
- Under Tools select Back Up.
- Under the Backup Settings section select the radio button labeled Domain configuration and content. Leave the drop box the way it is.
- DO NOT select the Suspend domain until backup task is completed. Should the backup fail, your domain would remain suspended and inaccessible to your website viewers..
- Once the backup is completed you can download it from the main backup screen by clicking on the Green Circle/Arrow icon on the right side of the backup listing.

Back Up a Site in Plesk 9.X
- Log in to the Control Panel and click on the Domains button.
- Select your domain.
- Click the Backup Manager button.
- Click the Back Up button.
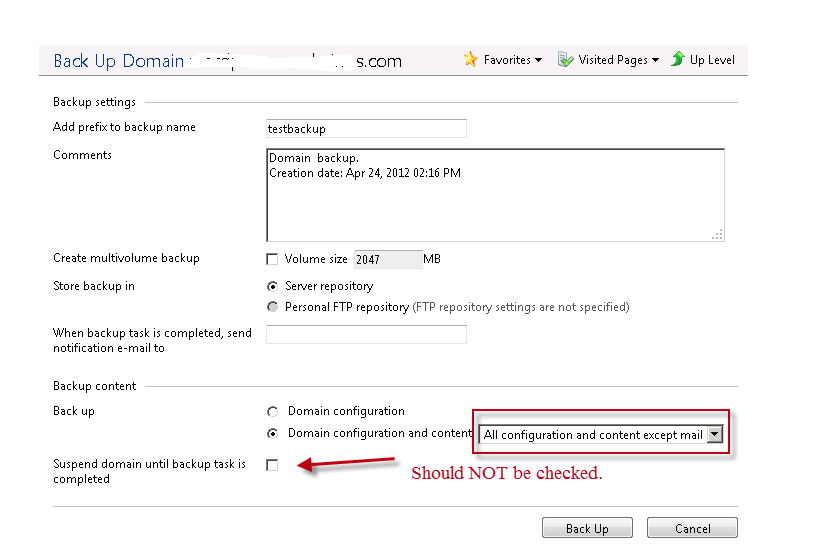
- Enter name for back up in Add prefix to backup name box.
- Select Domain configuration and content radio button.
- Select All configuration and content except mail from dropdown menu.
- DO NOT select the Suspend domain until backup task is completed this can cause issue where the domain will not unsuspend if the backup fails.
- Once the backup is completed you can download it from the main backup screen by clicking on the Disk icon.
Making Sense of the Backup (MS SQL)
- If you decide to download the backup created, when you open up the backup, the site files arelocated in the phostingfolder in a zip file named <backupname_vhost> .
- That database backup is stored in a .tmp file which you will want to change the file extension to.bak.
- To extract the .tmp file you will need to open the Databases> <databasename> folders and extract the zip folder named <backupname_databasename>.
- To restore the database backup you will want to use the Restore Database function of

Making Sense of the Backup (MySQL)
- If you decide to download the backup created, when you open up the backup, the site files arelocated in the phosting folder in a zip file named <backupname_vhost> .
- That database backup is stored in a .tmp file which you will want to change the file extension to.sql.
- To extract the .tmp file you will need to open the Databases> <databasename> folders and extract the zip folder named <backupname_databasename>.
- To restore the database backup you will want to use the PhpMyAdmin web administration interface. To access the PhpMyAdmin interface see How to access the PhpMyadmin Interface.
